|
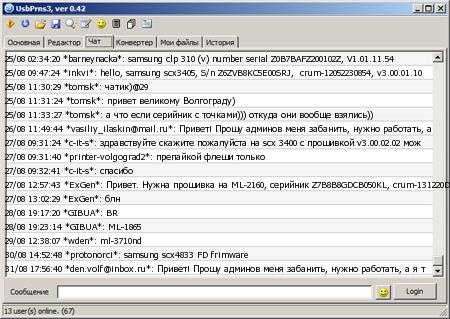
Main purpose - replacing UsbPrns2, for firmware the selected device.
firmware all printers
The latest version - 0.43.
You can get here
View training video for use. Educational video the program Usbprns3en
A short list of features for bookmarks:

1. Main
- The list of all connected devices, the get serial number
- Select brand and model vehicle
- Check it - check the firmware on the validity :
- Fix it - sends the selected file to selected device
- For buy fixing firmware, please send e-mail on
Этот e-mail адрес защищен от спам-ботов, для его просмотра у Вас должен быть включен Javascript
with printer model, OS version, and serial number of 15 characters.
More here
After get the fixing firmware file can flash the printer. It can drag & drop to a form or open the appropriate button - [...]
Be careful with the experiments, you can not firmware or not to:)
3. Chat
- Just chat and will answer helpful when there is nobody to ask:)
6. History
- Current information
With regards to the functionality or bug, please report
by email
Этот e-mail адрес защищен от спам-ботов, для его просмотра у Вас должен быть включен Javascript
Reading AT 88
You can download the last software version on our site
http://monitor.net.ru/forum/viewtopic.php?t=379190
. Find it in “download” tab. Resetter has two parallel programs (mcprog.exe
и
AT88resetter_V2.exe). You can choose the one that is more convenient for you. Both programs supports all the functions of resetter.
The voltage on VCC CRUM in resetter is set up to 3.33V , this voltage will be set up after connecting resetter to USB. If you think it needs to be corrected (for more stable work or else) just select the suitable value in menu. Voltage will stay unchanged until you change it or reload resetter. If you want to change the default voltage when the resetter starts, you can ask me and I will tell you how to do it. You can also turn on/off power supply on CRUM from resetter debugging menu. The power is controlled by the program during reading/writing process.
Attach coloured connectors to CRUM model in the following order:
Black – GND connector
Blue – SCL connector
Green – SDA connector
Red – VCC connector
Select the model of printer in a list then press “Read” device and read AT 88. Then save the dump. If you know what to change and how to change in a dump then you can do it. If you do not know it :
How to change dump in CRUM module:
1)
Open the program
2)
Choose the model of printer and read info
3)
Click the button “Open hex. File” in a program and open hex. File with a model of your printer ( from Dump collection)
4)
Change some digits in serial number of CRUM ( digits after word “CRUM” in the right side of program)
5)
Click “Program Device”. If you see a message saying “Verify completed successfully” than CRUM is changed.
Printer remembers the last serial number so it is necessary to change.
Do not play with passwords! Do not press “Read” button several times running if data does not open, maybe password is not from this CRUM. Remember that counters of wrong passwords are increment. You can acquaint with it in distributive, there is a picture with locations of this counters. There is only one protection for counters in resetter – it does not allow to decrement the last password counter. The last attempt will be never used. If the counter will reach the penultimate attempt ( you will see an error report about it) just insert the CRUM into its printer and turn on. Printer will lead in the correct password and counter will drop into initial condition. The value of password counters you can see in "Read Without Present Of Passwords (Safe Mode)" in configuration zone. Counters can only have the next values : ($FF, $FE, $FC, $F8, $F0, $E0, $C0, $80, $00), where FF- means not used attempts, 00 – means dead chip. Chip dies after 7 attempts.
It is not possible to change a zone of configuration in this resetter.
XEROX 3635 and XEROX 3600. Original chips can not be changed because of another protection chips of these configuration. Not original chips are produced with standard protection and can be changed. You can check protection the following way:
Read the chip without passwords. Open data from configuration zone and find 20h address. If number 0
х
56 is written on this address then you can not change the data, but if number is 0x57 then data can be changed. It is possible to use a chip from KL-4550 printer cause it uses the same passwords and load a dump to it from XEREX 3600, then everything will work because ML-4550 has a standard data protection and it can be changed.
The button on resetter board is used only for uploading a new software to resetter (is supplied separately as far as software appears).
Downloading software
1)
Press the button on resetter and connect USB (holding the button!!!). Release the button. Led on resetter is alight and it will start blinkig when driver will be found.
2)
Open the program. It will be a message that equipment is found
and buttons will be active.
3)
Open hex. File I sent you in a program and click “Program Device”.
4)
Click “Reset PIC18F2550” (without holding a button!!!). Led will start blinking another way – so software is downloaded successfully. Resetter is ready for working.
ProgramsHome.com
|


